Southern Agrarianism and the culture of the Old South

Tag: tools

Tool Review – SoilSaver Composter

Composting is pretty much standard for anyone with any kind of garden. It’s part of the natural cycle – the soil provides the nourishment that provides the crops, and we then return what we don’t use back to the soil, along with whatever other organic matter we can add. I’ve gone through several different types of composting systems, but my current one – the SoilSaver composter – does just what a composter is designed to do, and it does it well.

What I’ve used previously
ꔷ The old school standard that our family used when I was growing up was just called a “Tomato Ring”. It was a piece of fence in a circle about three or four feet in diameter that held leaves and whatever else was available. They worked, but only if you kept it watered and turned over; it was a rather labor-intensive system and was too quick to dry out.
ꔷ Next was a rotating drum system. In theory, this should be ideal – but it wasn’t. After numerous attempts, I found that every single batch would become anaerobic – it was not getting enough air mixed in, and it would become a slimy, putrid mess. A rotating drum with enough ventilation would apparently be too porous and lose its contents when being turned.
ꔷ After that was a round plastic composter that had an open bottom. This one worked well. The open bottom prevented water from accumulating, while allowing it to remain wet enough to decompose. It worked great until the side split and it had to be scrapped.

The SoilSaver (Amazon link) is what I am using now, and have been for the past three months; based on that, I added a second one a month ago. The SoilSaver is well-designed and sturdy when properly assembled and set up. One of the keys to “properly assembled” is following the instructions when it says that it must be set up on a flat level surface. The first time I set one up, the ground was not flat enough, and the top would not fit on very well. Removing the contents, leveling the ground beneath it (i.e., actually reading and following the instructions), then filling it back up made all the difference. The top now fits neatly and closes securely.

Nothing is perfect, and the SoilSaver is no exception. It is assembled with plastic nuts and bolts, and it comes with a wrench to tighten them down. It doesn’t take much to over-torque and strip them. They really ought to include a few extra of the plastic nuts and bolts – it couldn’t cost more than a penny or two extra. That’s it – the only thing I could find to criticize about it. Assembly is fast and easy, and it is designed to make assembly pretty much foolproof. When the sides are assembled, it is rather unstable when carrying it, so it’s best to put it together pretty close to where you’ll be using it.

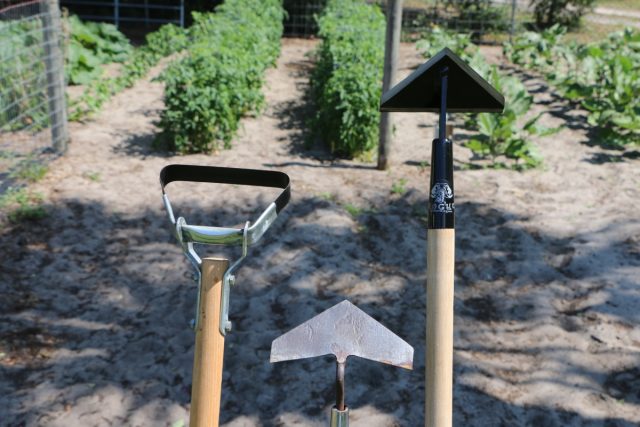
While we’re on the topic of compost bins, a “must have” tool is the Yard Butler Compost Aerator (Amazon link). I first learned of this tool after seeing one being used at a demonstration garden at our county Ag Center. You’ve got to keep things mixed up and aerated, and this tool makes it fast and easy. I’ve read some reviews complaining that, after a while, the “wings” get rusted in place and it no longer works. Nonsense. Any tool needs to be kept clean and oiled if you expect it to work well and to last, and this is no exception. I keep mine in the tool shed when I’m not using it, and I always wash it off when I’m finished with it, and if I see any rust starting to form, a drop of oil is all it takes. As my father liked to say, “Take care of your tools, and they’ll take care of you.” I have been using mine regularly for a number of years, and it works just as well now as when I first got it. Highly recommended.

What comes in the box.

Yard Butler Compost Aerator.

Tools For The Garden

Gardening can be very time-consuming, hard work – unless you have the right tools for the job. The right tools can make the work fast and easy, and they can allow someone to reasonably produce enough food to feed their family where it would not be possible without them.

The top photo shows my current collection of manual garden tools. This does not include the BCS two-wheel tractor and implements that are stored in another area. I tend to collect garden tools like some folks collect guns – better to have it and not need it than to need it and not have it. One can never have too many garden tools. I even have a broad fork – a beast of a tool that I might even need some day. In future posts, we’ll look at some of the more interesting tools in my shed.

The second photo shows two extremes in tools. One item is a Rogue Field Hoe (reviewed here) – a great example of a high quality tool that should last a lifetime or more. The crude stick with a metal spike driven through it is not an ancient relic from an archaeological site or something sold to tourists. It is a hand hoe that is in routine use today in Africa. Specifically, this one was purchased at a village market in Sierra Leone, West Africa by missionaries there that I work with. This could correctly be called state of the art technology in most of Africa today. Yes, there are certainly tractors and modern tools in use there also; however, those are imported. When it comes to tools made by the locals, this pretty much says it all. There are some lessons to be learned in this.

Western hoe and African hoe – both manufactured about the same time, and both routinely used in their respective areas.

OK. What’s the point of this post? Ask yourself how you would produce enough food to feed yourself and your family if you had to work the soil to feed them. Stored food doesn’t count – that eventually runs out. Power equipment is great, but it doesn’t count either – fuel very quickly runs out. What you’re left with is muscle powered tools. Most of the world will reply with rolled eyes and a smirk. “It couldn’t happen here” they would say. Perhaps they are right. I certainly hope they are right; however, I’m not going to bet my family’s life on it. Do you?

Clean it, Maintain it, Fix it


In a reply to a previous post, I was reminded of the need to learn to make do with what we have and to repair and maintain things. That brought to mind the two tools shown in the photo above – both tools have been in the family for several generations. The grubbing hoe is still in quite usable condition despite the handle being wrapped with a strip of metal that has been nailed in place. The axe, on the other hand, is just kept as a reminder of a time when tools were treasured and were not easily replaced.

One of life’s great lessons is learning that it always pays to buy quality and then maintain it. Quality tools, well cared for, maintained, and repaired as needed, are far better than saving a few dollars buying Chinese junk and then replacing it because it’s not worth repairing.

One of my routines is to always wash all of my garden tools and set them out to dry when I’m finished using them. Most of the time, that is all that is needed before hanging them in their place in the tool shed. If a tool should start to get some rust on it, I clean it off with a wire wheel or whatever is appropriate, rub a bit of oil on it, then put it away. About once a year, I go through all of my tools and use a file to sharpen them, but some tools get sharpened more frequently.

Wooden handles are too-often neglected. I use a rag to rub linseed oil into the wood handles of my tools. If they are treated with reasonable care and stored out of the weather, a good hardwood tool handle should last a lifetime and be able to be passed down to the next generation. Some folks prefer to paint their wood handles, but I’ve never had any desire to do that. 1) I love the look and feel of real wood, and 2) Paint can hide cracks and other problems that should be quickly taken care of.

The grubbing hoe in the photo probably came down with the family when they moved from Alabama to Florida in about 1921 – nearly a century ago. Although we usually associate covered wagons with pioneers moving west, that is how my grandparents moved their family and household goods down here. My grandfather built a covered wagon that was pulled by oxen. It was driven down what was called the Florida Short Route, marked by crude signs and tree carvings saying “FSR”. The cattle were carried by train, and some of the family was loaded into an old Ford, and off they went to find a place where the farming was easier than the rock-filled clay of McGehee Mountain in Clay County, Alabama.

Getting To Know The Scuffle Hoe

Three Scuffle Hoes

Three Scuffle Hoes. The one on the right is made by Rogue Hoe and is built to last a lifetime.

My cousin introduced me to the Scuffle Hoe, and I’m grateful that he did. The Scuffle Hoe is a rather specialized tool. It does an excellent job of getting rid of small, just-emerging weeds in loose soil. The sandy soil that we have here in this part of The South is ideal for using this tool – especially when it is dry.

The Scuffle Hoe is used by sliding the blade just a bit below the surface to cut the weeds off below the ground level. If the soil is dry, that makes it easier to use, and the weeds dry out very quickly so they can’t take root again. It is much easier to control than a regular field hoe when working close to garden plants. Think of it as a maintenance tool intended to keep your garden clean. Use a regular field hoe for the big stuff.

There are two basic types of Scuffle Hoe, and they both work the same way. One uses a blade (shown on the left in the above photo, also known as a stirrup hoe) and the other is a triangular blade. So far, both have held up well, but I suspect that the triangular design is the tougher, more durable of the two.

If you haven’t used one before, make it a point to get one and try it out. If you have very hard packed soil or heavy clay, wait until you’ve improved the soil before trying to use one. If you start out with a clean garden, a Scuffle Hoe will make it easy to keep it clean.

Seed Handling

When planting large seeds, such as squash, pumpkin, beans, etc., it’s easy to just grab a small handful of seeds and set them in the soil. If you’re using a row planter, it picks up one seed at a time and spaces them out quite nicely. When it comes to handling small seeds and placing just one seed in a pot or a soil block, how do you pick up and move that one tiny seed? I have tried several methods and have settled on some tools that work well for me.

I have been using the Gro-Mor Mini-Wand Vacuum Seeder for several years now, and it still amazes me how such a simple tool can make such a big difference. The vacuum seeder uses a vacuum bulb to pick up one seed at a time and then release it when needed. It comes with several tip sizes that can be used for different size seeds.

There are several different designs, and I’m confident that there are others that work just as well as the one that I’m using. The important point is that you need a specialized tool to efficiently handle tiny seeds. You don’t want to waste seeds, and you don’t want to plant more than one seed in a single hole. A good seed dispenser will solve that problem.

I am using a different soil mixture for this batch of seeds. This is two parts ordinary potting soil with one part Perlite.

Using the Gro-Mor vacuum seed dispenser to plant bell pepper seeds.

Using the Gro-Mor vacuum seed dispenser to plant bell pepper seeds.

A small number of seeds are placed in a cup. The seeds are then picked up and moved, one at a time, into the seed holes.

A small number of seeds are placed in a cup. The seeds are then picked up and moved, one at a time, into the seed holes.

A different type of seed dispenser being used to cover the seeds with medium Vermiculite. I then use a misting nozzle to wet the surface without disturbing the seeds.

A different type of seed dispenser being used to cover the seeds with medium Vermiculite. I then use a misting nozzle to wet the surface without disturbing the seeds.

Review of the 7″ Rogue Field Hoe by Prohoe

I don’t use a hoe very much – at least not as much as some people do.  Unlike many people though, I have a deep appreciation for high quality tools and don’t mind paying more for something that, if given reasonable care, my grandchildren will be able to use. The 7″ Rogue Field Hoe by Prohoe is such a tool.

Prohoe Manufacturing is a family owned business in Kansas. The grinding, welding, and sharpening are all done by hand. The steel used in their tools is from recycled agricultural disc blades – and that’s some very tough, high quality steel. They have a heft to them that makes it easier to use than the lightweight, made-in-China hoes that most folks (myself included) own and usually think of as a hoe. I have used mine for several years now, and while my made-in-China hoe has all sorts of small dents and deformations along the edge, my Prohoe is still just as sharp as can be without any significant deformation of the edge. I need to point out that this is very easy soil to hoe and your results may be different, yet the cheap hoe still will not hold an edge where the Prohoe does. As with any tool, cleaning matters. I am almost obsessive about making sure that my garden tools are thoroughly washed before being hung on their rack in the shop.

Prohoe makes a number of different designs, but the one I have is the 70F Field Hoe. I am just as satisfied as can be with my Prohoe field hoe and fully expect my grandchildren to inherit and use this hoe for many years.

Now for the usual disclaimer – I have no financial interest in Prohoe, I received no compensation of any kind for this review, and I paid for my hoe out of my own pocket – every penny of it. I really hate having to write this kind of disclaimer. It wasn’t long ago that men were honorable enough to simply tell the truth without the government having to tell them to do so. The idea of the government telling people to be honest has a delicious bit of irony, doesn’t it?

Three Tools

There are three basic garden tools that I consider to be necessities. These are the ones that I use constantly.

  • Stainless steel garden trowel. I have several garden trowels around, but this is my favorite. It is solidly made and will not rust. I also have a larger one made of cast aluminum, and that is also a favorite when a larger size is called for.
  • Pruning shears. I have several of them around, and the main reason that this one is still here is that I also got a clip-on holster for it. Far too many of them would get lost when using it for pruning jobs around the yard. I would set it down and forget where I put it until it had rusted beyond use. The main use for them though, is for harvesting from the garden.
  • Garden knife. This is a Japanese knife made of stainless steel. It gets used for all sorts of things, like planting sweetpotato slips and rose cuttings, sawing through roots when running a water line for the chickens, and general poking around in the garden. I plan to make a Kydex sheath for it that I can attach to my belt. Someday maybe I’ll actually get it done.

We have all accumulated a wide variety of garden tools, but the rest of them tend to get buried at the bottom of my box of garden tools and they are never missed. These three tools are the necessities.