Southern Agrarianism and the culture of the Old South

Tag: garden (Page 4 of 4)

Switzerland, Chickens, a Garden, and Ronda

The lovely Southern Lady on this magazine cover is Ronda – the step-daughter of my best friend from college. Ronda and her husband live in Lausanne, Switzerland – an incredibly beautiful place that looks more like a dreamy postcard than a real city. Lausanne is on Lake Geneva, with the French Alps on the other side. Ronda and her husband live in town, and the article is about the young business woman from America with a small “farm” in her back yard. She grows vegetables, blackberries, blueberries, figs, apples, and now, chicken eggs.

Gardening in West Africa

This is a follow-up to a previous post in which I mentioned that some of the seeds that I have been collecting from my garden would be sent to Sierra Leone, West Africa with some of our missionary friends. These photos are some that they sent of their garden.

Although okra was originally brought to America from Africa, the variety of okra grown there today is typically a very primitive type. There is very little attention paid to developing improved varieties, so the best route was for them to bring seeds back from America and hope that they will serve as the foundation for a strain that will be well-suited for the West African environment.

In West Africa, the climate is tropical, but the dry season is influenced by the Sahara, to the north. The dry season is very dry and the rainy season is very rainy. In the words of Joseph, their local helper, “Sista, let de rain meet your seeds in de soil.” Very simple words from very simple people, but containing much wisdom.

Part of the garden. In the background is the classroom building where native men are trained in The Bible. The tree in the center is a Moringa tree - an incredibly useful tree that I hope to get growing here.

Okra from our garden now growing in West Africa. The variety is Clemson Spineless.

Blue Lake Bush beans getting started.

Soil Blocks Update

On the Starting Seeds page, I showed how to use a soil block mold for starting seeds. After much experimenting, I have made a few modifications to the process.

  • I no longer try to pack the soil mixture in tighter than I can get by just pressing down several times. I had even tried using blocks of wood to pack it in tighter. While that gave good results, it was pretty tough on the hands, so I went back to the method recommended by the manufacturer. I still try to pack it in as tightly as possible, but only by pressing the mold into the mixture.
  • I no longer use a bucket to press the mold into the mixture – I now use a stainless steel warming tray that I bought from a used restaurant supply store. This is much easier to work with and it allows me to make much better use of the wet soil mixture than I could with the rounded sides of a bucket.
  • I have added galvanized hardware cloth in the bottom of the seed trays. Previously, the blocks would get damaged when I had to move the trays. The stiff, flat bottom that the hardware cloth provides keeps the blocks from bumping into each other.

Hardware cloth lines the bottom of the tray to keep the blocks stabilized when moving the tray. This is a big help in keeping the blocks from being damaged.

The work area. From front to back: water bucket to clean blocker between moldings, stainless steel warming tray where the blocker is packed, seedling tray where blocks are placed when finished.

Packing the growing mixture into the soil blocker.

A garden knife is used to cut away excess from the bottom.

Wipe away excess from the sides using your fingers.

Four soil blocks being extracted from the mold and onto the seed tray.

The soil blocker is rinsed off between uses. Keeping it clean helps make the blocks uniform.

When the blocks have been extracted from the mold, it is not uncommon for part of the block to separate. Use a metal putty knife to gently press the block back into shape.

Use two putty knives together to separate the blocks. They need to have enough air space between them to keep the roots of one block from growing into an adjoining block.

How Much Okra?

Sometimes it just helps to see how much a given area can produce rather than reading numbers on a spreadsheet. Okra, beside being something I thoroughly enjoy, is a very prolific producer. Here are two photos – the first showing the area planted, and the second showing a typical yield. I pick okra about every 24 to 36 hours. Anything more than that, and you’re going to have okra that is past its prime.

Lessons Learned – Part 1

I’m titling this one “Part 1”, not because I have a “Part 2” in mind, but because learning new things is an on-going process. I’ll write “Part 2” (and 3, and 4, and …) as soon as I have more lessons learned that I want to record.

More Plant Spacing – I have been planting too closely for most plants. By the time the plants mature, they are so densely packed together that the inner leaves do not get sufficient light, so they just yellow and die. There is not enough air circulation to dry the inner parts of the plants, and though I can’t prove it, I suspect that the plants would be healthier with more room to “breathe”.

Use Plant Cages – Primarily for tomatoes, but also for plants like peppers, some way to stabilize and contain the plants is a major advantage. Some of the tomato plants have grown over the sides of the garden and down to the ground. When they grow that big, they are much more difficult to work with, and much more susceptible to broken branches and other damage. We haven’t had any high winds yet, but plant cages will keep the plants from being blown over by the wind.

Prune Where Needed – The tomatoes ended up putting too much energy into growing branches and leaves rather than in growing fruit. Although pruning tomatoes is more commonly done in the northern parts of the country, I will be pruning my next crop of tomatoes. This is also related to using tomato cages to contain and train the plants.

Upon doing some more reading, it looks like this year’s poor blackberry crop may be due (in part) to not having done any pruning on them. I’ll do that next season. I also neglected to give them the fertilizer and water that they should have gotten.

Grow Up – Not Out – I had planned to use bush beans and determinate variety tomatoes and plant in stages, thinking that I would then get enough beans in a single flush to be able to can the surplus. Somehow, that just didn’t work out as planned. I’ll be going back to pole beans and indeterminate tomato varieties so the harvest is spread out over the life of the plant rather than one large flush of produce and then the plant dies. This also allows for better utilization of the available area in the garden. The various trellis designs that I have been experimenting with look very promising.

Better Planning – I have been pretty much planting wherever there was an empty space in the garden. That kind of haphazard planting just doesn’t work very well in the long term. I will be dividing the garden into 4 sections, and making sure that crops are rotated so that it will be 4 years before a section contains the same type of plant. That should help reduce soil-borne disease and balance out the nutrients in the soil.

Earlier starting – I did fairly well this year, but I still want to start my seeds for the Spring garden around the end of December or first of January. In this part of the country, with the seedling setup that I have, that should work out just fine. There may be some risk of a late frost, but the plants can be covered if needed. I usually try to have at least twice as many seedlings as I plan to use in case of a problem like that. If they aren’t needed, there are plenty of folks eager to take them.

Color Makes a Difference – This year, we planted both yellow squash and zucchini. Both grow about the same, both taste about the same, but both look very different. I discovered that the dark green zucchini is very easy to overlook among the dark green plant. Several times, I have discovered huge zucchinis that are far bigger than I wanted (although they do quite well when baked). They got that way because I overlooked them. Next year, we might be growing yellow squash and not zucchini, we’ll think that over carefully before planting. The bright yellow squash stands out and is a lot easier to see when it’s time to pick them.

Mix it up – I have noticed some differences in the sections of the garden that I can only attribute to not having mixed the growing mixture up well enough. When the hot weather garden is finished, I will be adding some more compost and doing a better job of mixing it up. Just to make sure though, I’ll be doing some soil testing.

ECHO Demonstration Farm

We recently visited the ECHO Demonstration Farm in Fort Myers, Florida. ECHO (Educational Concerns for Hunger Organization) is a great resource for those wanting to learn how to grow food in difficult conditions. This trip was focused on a missionary project in Sierra Leone, West Africa. I am vice-president of Gather The Fragments Bible Mission Church, Inc. – my wife and I provide logistical support for missionaries working to spread the Gospel of Jesus Christ in a remote part of a very remote country – Sierra Leone. This trip to ECHO was with one of those missionaries so that she could learn more about how to improve the agriculture in that area.

ECHO publishes some excellent books. “Amaranth to Zai Holes – Ideas for Growing Food Under Difficult Conditions” is one of my favorites. While it covers problems that we in The South usually don’t face (iguanas, elephants, and monkeys are not typical garden pests here in The South), it is filled with great ideas that we can use here.


Guide describing the "urban garden" area. The farm is divided into different environments, and the urban garden area is build on a concrete slab.

The chickens coop in the back supplies manure, which is made into a tea, which is drip irrigated on the plants.

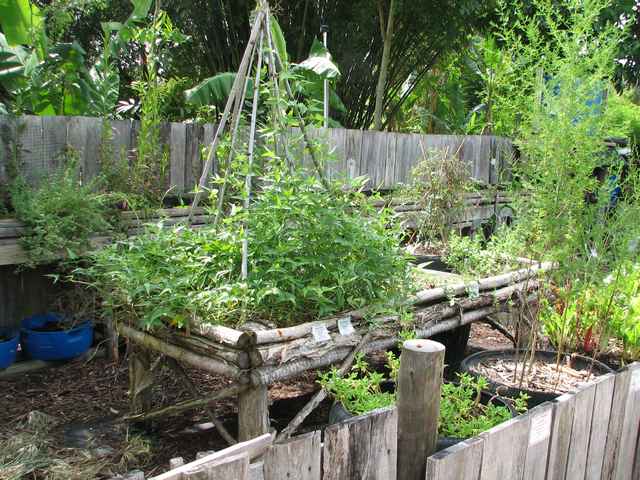
Wooden pallets used to build a platform that holds plastic bags of soil for plants to grow in.

Poles forming a pyramid for plants to climb on.

Extremely shallow planting. A plastic pool liner was used, along with a piece of old carpeting to grow crops in. Hay and other materials provide shade for the roots and reduce evaporation.

More shallow garden experiments. All of these are right on top of a concrete slab.

Plants growing in concrete blocks.

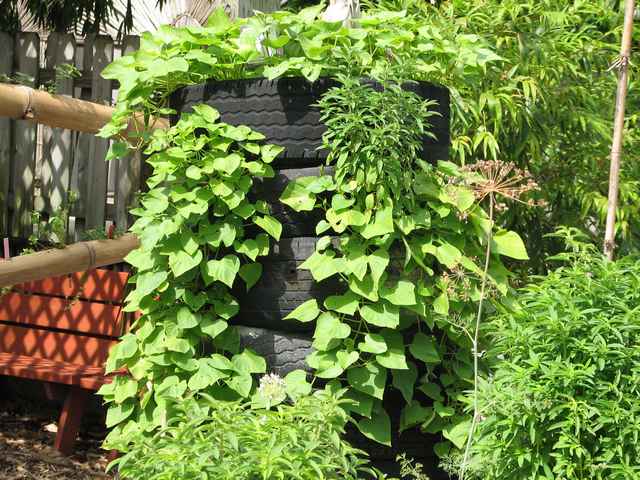
Sweet potatoes being grown in a stack of old tires filled with soil.

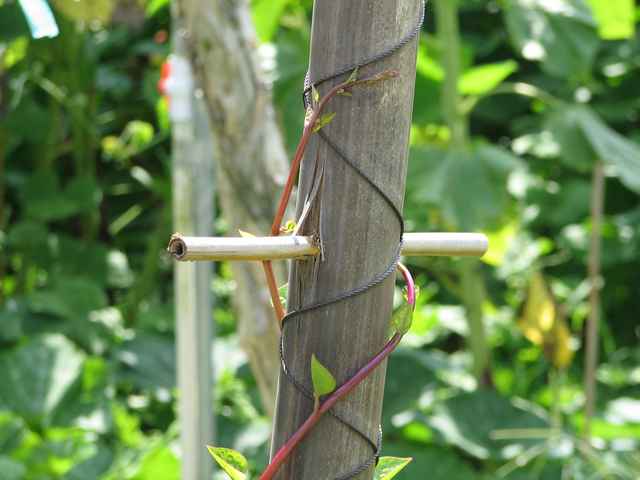
Tall poles (about 12' tall) were used to support climbing plants such as pole beans and cucumbers. The cord wrapped around gives the plants something to hold onto. The poles were supported with guy wires.

Biogas generator. This system uses manure to generate, capture, and store methane gas. The gas is stored in a truck inner tube. It is used to run a stove and lantern in this arrangement.

This is a dug well that has two pumps in it. The one being demonstrated here uses a hand crank that pulls pistons on a rope through a PVC pipe to pump the water.

This is a treadle powered pump that supplies the garden area to the left.

Huge sunflowers being grown here. These are the "Mammoth" variety.

Rice paddy demonstration. This is the traditional flood technique. Part of the reason this technique is used is to raise eels that are a delicacy in some parts of the world.

This is a newer, more efficient method of growing rice. The fields are not flooded, and other crops are planted between rice crops.

These ducks are part of a food producing ecosystem that includes micro-organisms that feed on the duck manure, and tilapia that feeds on organisms a bit higher on the food chain. The end result is meat from the fish, and eggs and meat from the ducks.

Plants being readied for their place at the ECHO farm.

Bunnies in the garden

Most folks see rabbits as the enemy in the garden. Fortunately, that’s not a problem with a raised bed garden such as mine. Even the strongest rabbit couldn’t jump high enough to get to the plants in my garden. For that reason, I enjoy having them around. I have even built up a few places where they can nest unmolested by our dog. Like chicken snakes eating an egg now and then, they are part of the entertainment value of living out here.

This little guy was out in the open (where he shouldn’t be) this morning as I was taking pictures of my water tower project. We have several patches of aloe plants, and rabbits like to burrow under them for their nests. Aloe, by the way, is great to have around for minor burns and other skin injuries; they are a favorite of hummingbirds, further adding to the entertainment value.

Planting in Stages

Looking from back to front in this photo: Tomatoes, the first batch of beans, the second batch (planted 2 weeks later), and dirt where the unsprouted next batch of beans will be coming up in another day or two. These are the Blue Lake variety – our all around favorite.

Bush beans tend to produce in one large flush of beans, followed by a few sparse beans later. By planting in stages, we get fresh beans while also having them ripen in a large enough quantity to make it worth cranking up the canning operation.

Pole beans tend to produce regularly throughout the life of the plant. Those are great when you have a good place to plant them. We have some planted so that they climb up the water tower that supplies water for the chickens (more on that project in another post).

Picking Worms

Before you can pick vegetables, you usually have to pick worms. So far, I have done all my gardening without using any pesticides, and hand-picking worms has actually proven to be quite effective.

Going out to the garden is part of my morning routine – let the dog out, check the chickens, check the rain gauge, and check the garden. When worm season is here, that also includes looking for damage and squashing the worms that caused it.

Newer posts »